Mold Inspection Tips

HOW TO ELIMINATE BLACK MOLD WITH AMMONIA

Wear a respirator and gloves when working with ammonia-based mold cleaning products. Never mix ammonia with chlorinated bleach

Open nearby windows or doors to get a cross-flow of air to dissipate any fumes generated by your cleaning (small mold cleanup projects – large jobs will require negative air pressure and sealing off area to prevent mold spores from escaping throughout residence)

  • Combine ammonia and water in 50/50 proportions.
  • Pour the solution into a spray bottle and spray contaminated areas evenly.
  • Allow the mold killing solution to sit for 5 or 10 minutes.
  • ​Scour mold tarnished area with a small brush or equivalent and wipe clean.
  • Repeat if necessary.

Often enough, many mold killing products will have ammonia already in them. Be extra cautious to follow the directions on the label to the letter and ensure that the cleanser is never mixed with bleach (in part or whole)!

Otherwise, ammonia is similar to using bleach in that it should only be used on non-porous areas – Always wear gloves when working with any chemical and wash hands immediately, thereafter!


Mold Removal with Borax

There are many advantages to using borax to kill mold. For starters, borax is a natural cleaning product and although it is toxic if you swallow it, borax does not emit chemicals or dangerous fumes like some other mold killers. Borax, a white mineral powder, has a pH level of about 9 (baking soda is pH 8.1 and pH 7 is neutral) and a low toxicity.

Borax is commonly used as a deodorizer as well as for cleaning toilets and drains. Borax is also used as an insecticide, herbicide and fungicide and it can be mixed with water in a solution to kill and remove mold as it is a natural mold inhibitor. You can buy borax in supermarkets for a few dollars from the laundry section.

How to Kill Mold with Borax

  • To kill mold using borax, create a borax-water solution using a ratio of 1 cup of borax per gallon of water.
  • Vacuum up any loose mold with a HEPA filtered vacuum cleaner to lessen the number of spores stirred up into the air during the cleaning process.
  • Use a scrubbing brush with the borax-water solution to scrub the mold off the surface.
  • Wipe up any extra moisture and excess mold particles or dust/debris to prevent them spreading into the air once the surface has dried.
  • You don’t need to rinse off the borax as the solution will prevent more mold beginning to grow on the surface again.
  • Leave the surface to dry completely.


How Do You Use Vinegar to Clean Mold?

To safely and effectively clean a small area of mold, ServiceMaster advises the following:

  • Add full-strength white distilled vinegar to a spray bottle and spray it on the mold.
  • Let it sit for at least an hour before wiping away mold.
  • If you need follow-up scrubbing, combine one teaspoon baking soda with two cups of water. Pour it into a spray bottle, shake and spray it onto the mold. Scrub with a brush or scouring pad.
  • Rinse with warm water, then spray again with the vinegar and let it dry.

To protect yourself from mold and its spores, wear gloves, a mask and goggles. Gloves also prevent any skin irritation from the vinegar.

Where Not to Use Vinegar to Kill Mold

Because of vinegar’s acidity, it can damage some surfaces. We don’t recommended using vinegar on natural stone, waxed wood, cast iron or aluminum.


How to Remove Mold with Baking Soda

Unlike bleach, baking soda won’t harm or discolor the tiles or present any health hazards to the occupants of the home. It will clean the affected area very well, but won’t be as efficient in killing the mold spores as bleach.

There are several different ways you can use baking soda to clean the tiles and grout in your home:

  • Mix 1/2 cup baking soda with one gallon of water and spray the mixture on the affected area. Wait for about half an hour, then rinse the surfaces thoroughly with warm water;
  • Dip a damp sponge into pure baking soda and scrub down the tiles and grout with it. Rinse with warm water;
  • Stir 1/2 cup of baking soda and several teaspoons of water to make a paste you can spread directly over the mold. Apply the paste to the moldy grout, let it sit for 10 minutes, then scrub away with a bristle brush. Rinse with water and repeat, if necessary.


How To Remove Mold From Shower Caulk

Mold on shower caulk can be a little more difficult to remove sometimes, so the procedure is slightly different.

To remove mold from shower caulking you will need:

  • A small bowl or similar to mix a solution in
  • Some Bleach
  • Protective gloves
  • A respirator mask
  • Baking soda
  • Plastic wrap (the stuff from your kitchen is fine)
  • A disposable paint brush

Once you have your items, use the following steps to remove mold from shower caulk:

  • Put some baking soda in your bowl and slowly add small amounts of bleach until you have a paste-like substance (make more than you need, you don’t want to run out and this is cheap stuff)
  • Grab the paint brush and use it to apply the paste to the mold
  • Use the plastic wrap to cover the paste on the mold – this may be a bit difficult depending on the location – just do what you can
  • Leave it to sit for at least 1 – 2 hours
  • Remove the plastic covering and clean off the paste (which may have dried out). If your mold is gone then you are done. If the mold is still there then start again

Surprising Ways Clogged Toilet Hurts The Environment

What to do When Your Toilet is Clogged

Picture your worst nightmare coming true: a clogged and overflowing toilet! You’re not sure how it happened. Maybe it was the ultra-plush 2-ply toilet paper, or maybe it was the takeout from last night? You can’t be sure, but that doesn’t matter at the moment because all you can focus on is the torrent of water that’s rushing out of your toilet and onto your bathroom floor

There are few things in the world that cause more panic and disgust than a malfunctioning toilet. Unfortunately, it’s something that everyone will probably have to deal with at some point. It’s a dirty job, but somebody has to do it. Menards® is here to help you slog through the chore of unclogging your toilet and prevent it from ever happening again. Don’t worry; you can thank us later (after you’ve washed your hands).

The first and most important thing to do is to STOP flushing. If the first flush doesn’t work, the second will only make things worse. Your biggest priority now is preventing your toilet from overflowing. If it is already starting to overflow, turn off the water valve, which should be located at the base of your toilet. If your toilet doesn’t have one, just cut off water to your bathroom or toilet if possible. If your toilet is simply clogged and not overflowing, you shouldn’t have to worry about turning off the water.

Take the lid off of the toilet and close the flapper (the little contraption that looks like a drain stopper attached to a chain) at the bottom of the tank. Now don’t chicken out, the water in there is clean.

If your toilet bowl is nearly overflowing with water or you’re worried about a mess, place newspapers, paper towels, or old towels on the floor, open a window, and find some rubber gloves. If you’re (un)fortunate enough to realize that the obstruction causing the clog is something that can’t be flushed (children’s toy, bathroom product, etc.), it’s time to fish that thing out of there.


Unique Ways to Clear a Clogged Toilet

Calling a plumbing contractor to clean up your blocked toilet is just one of the most convenient ways to solve the issue. Sadly most of the professional plumbers ask for up-wards of 100 dollars for the task. It might be rather unpleasant to spend that much of money in this time of economic crisis and job reduction.  However, the good news is there are some unique ways you can unclog that toilet yourself without having to call in an expensive plumber

Wire

Yet another simple, yet effective device that helps in unclogging toilets is the wire. This extensively available item can be utilized to get to inside the bowl and delete items like plastic bags, etc. that cannot flush down the drain. You do not need to purchase a wire from the market. Simply take any commonly utilized product like a hangar and straighten it to make a wire. A pliable rubber pipeline can be an excellent substitute for a wire and can easily be made use of to clean a clogged pipe line.

Boiling Water and Dish Cleaning Agent

If the boiling water alone is inadequate, perhaps a pot of steaming water and detergent should work. Pour about a 1/4 cup of your preferred green cleaning agent, and let it to lube the lodged object while you wait for the water to boil. Pour in the boiling water making certain not to spray on yourself and hope that it will work … or else you might need to get a little messy.

Baking Soda and Vinegar

Adding a cup of baking soda as well as white vinegar and pouring down a sink drain has actually been known to unplug it, and could manage a toilet. This is of the toilet is not so loaded with water that the mix will end up too diluted when added in the bowl. If this is the case, then move right to the steaming water and dish detergent technique.

Tapping to Unclog Toilet

Giving your toilet a little tap is something you want to attempt first. It is fast and straightforward and all that is required is your shoe or your plunger’s wood handle. You will notice on the edge of your toilet, where you sit, and locate the bulge behind it that looks like a snake. This is the area you will want to tap with a soft object that is softer than the porcelain to ensure you do not break it. Your shoe’s rubber sole can be sufficient but if not utilize the plastic or wood handle of your plunger and begin tapping lightly on this snake bulge on the toilet. You will be impressed. If it does not function initially continue while utilizing the above steps as well and you should probably get it to work.


SAFE AND EFFECTIVE TOILET DECLOGGER

Let me tell you, I was one happy homeowner upon discovering this simple, cheap, and safe DIY Drano solution!  That’s because a plumber visit costs at least $150 and Drano and Liquid Plumbr scare the snot out of me.  Seriously, listen to the warnings from the Liquid Plumbr company itself about the dangers of its product

“…Never use Liquid-Plumr with other drain-cleaning products. The bleach contained in Liquid-Plumr can react with other chemicals, such as ammonia, to create toxic vapors. Also, use of a plunger can be dangerous, as the product can damage skin, eyes and mucus membranes on contact…Handling lye in any form can cause chemical burns and skin damage, and ingesting it can result in permanent injury or death.”

The best part, besides the fact that this all-natural DIY Drano actually works, is that it only requires two CHEAP ingredients out of my kitchen cabinets. Check out this DIY Drano recipe my 3-year-old could make and administer to said clogged toilet

ALL-NATURAL DIY DRANO RECIPE

1) Into a clogged toilet filled with standing water, dump 1 cup of baking soda.  Let it sink to the bottom.

2) If the toilet doesn’t have much water, add 1 gallon of boiling water to really get things moving.

3) Next, add 2 cups of vinegar slowly, so it won’t fizz over onto your floor.  Ickkk!

4) Let it sit for a couple of hours and see if the water has drained.  If it has not, let it sit overnight and then plunge, if needed, before flushing.

Tonight, I tossed in the DIY Drano and let it sit for a couple of hours.  When I returned, the standing water was gone and the toilet flushed right away!  However, the first time I used this all-natural DIY Drano recipe, I had to let the concoction sit overnight in the toilet.  After a good plunging, it began to work a little better.  I used the DIY Drano one more time, and after a few hours, the toilet was completely unclogged.


Ask A Plumber: The Best Way To Clean Your Drains

THE MATERIAL CONTAINED IN THIS ARTICLE IS PROVIDED FOR GENERAL INFORMATION PURPOSES ONLY AND DOES NOT CONSTITUTE PROFESSIONAL ADVICE.LANDMARK HOME WARRANTY DOES NOT PURPORT TO BE A SUBJECT MATTER EXPERT WITH REGARD TO THIS MATERIAL, AND YOU SHOULD CONDUCT YOUR OWN RESEARCH AND/OR SEEK THE ADVICE OF APPROPRIATELY QUALIFIED PROFESSIONALS WITH REGARD TO YOUR SPECIFIC CIRCUMSTANCES BEFORE YOU TAKE ACTION. LANDMARK HOME WARRANTY ASSUMES NO RESPONSIBILITY, AND SPECIFICALLY DISCLAIMS ALL LIABILITY, FOR YOUR USE OF ANY AND ALL INFORMATION CONTAINED HEREIN

Sometimes as you’re staring at a clogged drain or leaking pipe, you wish you had a plumber friend you could call to ask for some free advice. Then you could fix your plumbing problems without paying a dime (or at least not as much as a plumber may charge you to go out and diagnose or fix the problem).

Don’t use chemical drain cleaners

First thing first, Nelson does not recommend using any type of chemical drain cleaner on your pipes. If you have a clog, it’s better to try and remove it by plunging or snaking the drain.

According to ConsumerReports.org, most chemical drain cleaners are more trouble than they’re worth. Some react with aluminum and give off unhealthy gas, can solidify inside the pipes and can’t be removed, or mix with other household cleaners and cause the mixture to burst out of the drain. Crystal Chemical drain cleaners are extremely hazardous and can end up damaging your pipes, garbage disposal, and septic system. Liquid, foam and gel cleaners can also cause damage to pipes and usually aren’t as effective taking at least 30 minutes to eat through a clog.

Bathroom Sink and Tub Drains

According to Nelson, the number one cause of bathroom sink clogs is from toothpaste and long hair. If you have a clog in your bathroom sink or tub


things you should never flush down your toilet

Our home toilets are not trash cans made for dumping personal care and hygiene products. Here’s what you shouldn’t flush down the loo. There are only three things that you can flush down the toilet – urine, feces and toilet paper. In other words, human waste, or the three Ps: pee, poo, and paper.

The wastewater journey usually takes one of two directions. It either heads by way of a pipe to your community’s local sewer, or into a septic tank close to your home. Before it reaches your local treatment plant, wastewater goes through a screen of metal rods that filter larger objects and items that get into the sewers.

From there, it all goes to the settling tank where solids like sand and gravel that have been picked along the way settle to the bottom. These early treatment stations are also responsible for removing other “flushables.”

Did you know that 50 percent of the so-called non-dispersible material in wastewater is paper towels from public restrooms, followed by 25 percent of baby wipes, and then a mixture of condoms, cosmetic wipes, tampon applicators, and other items’? Finally, and after traveling through the primary sedimentation tanks, wastewater continues its cleaning process via aeration tanks, new settling tanks and, in some cases, tertiary treatment facilities where it is disinfected with chlorine and/or ultraviolet (UV) light.

In the end, and in the most advanced sewage treatment systems, we may get recycled water that can be used in agriculture or for human consumption. However, no sewage system is perfect. According to the World Health Organization (WHO), only 27 percent of the global population (around 1.9 billion people) use private sanitation facilities connected to sewers from which wastewater is treated.

Truck Tires Bead Seaters

Top Causes of Tire Failure…and Manufacturer Defect isn’t one of them!

Nothing is more frustrating than a tire blow-out, or a tire problem requiring an unplanned, early replacement of a new tire. When this happens, we often think the tire wasn’t strong enough or there is some sort of defect in the tire. Manufacturing defect, poor quality or faulty materials are rarely the causes of tire failure.  99% of the time, the causes of tire failure leading to a blow-out or pre-mature tire replacement was completely avoidable with a little more care and attention during routine maintenance or while driving.

Causes of Tire Failure: Under-inflation

One of the main causes of tire failure is under-inflation. Tires that are under-inflated flex more in the sidewall. Excessive flexing causes them to heat up far beyond normal operating temperatures. This problem is compounded when driving at highway speeds during hot weather for long periods of time. When the tire gets excessively hot, the rubber begins to degrade, which if driven on long enough, leads to a rupture in the sidewall of the tire, or tread separation. The result is an immediate and rapid loss of air pressure, often accompanied by a loud bang as the tire explodes.

In addition to the sidewall splitting, the inner liner will usually have evidence that the tire was run at low air pressure before it exploded. When the tire has been removed from the wheel, look for small chunks of burnt looking rubber and dust that has come off the inner liner. If your tire looks like this, it is likely that tire manufacturers, and most extended tire warranty programs, will deny any claim for credit or free replacement.


Causes of Tire Failure: Rapid / Irregular wear due to Mechanical Issues

Misalignment or worn suspension parts are another primary reason a tire does not wear evenly. The tire will be completely worn on one side, or in one area of the tire, but perfectly good, with plenty of tread on the other parts of the tire.  The owner has no choice but to replace the tire. Even if only 10% of the tread is worn through, that area will be the weakest and the most susceptible to flats. This condition also contributes to poor traction and ride quality.

There are two tread wear patterns that indicate the type of mechanical problem. The most common is tire wear associated with wheel misalignment. In this situation, one or more of the wheel and tires are going down the road at an angle to the direction of travel, or with too much camber built into the wheel set up.  In either case, rubber ends up wearing faster on one side of the tire compared to the other as shown in the photograph on the right. This tire has worn to the cords on one side, but still has plenty of rubber on the opposite shoulder. If the vehicle was aligned correctly, this tire would have worn evenly across the tread, and stayed on the vehicle for another 30,000 or 40,000 miles.

The second wear pattern that indicates a mechanical problem with the suspension of the vehicle is shown below on the left.  Broken suspension parts, or worn out and loose bearings or bushings create a wobble in the wheel and tire. Over time the

wobble in the wheel and tire manifests itself in the tire tread rubber, either as cupping on the shoulder tread blocks or as diagonal stripes of wear across the surface of the tread.  These wear patterns indicate a serious suspension issue that needs to be addressed for safety reasons and for the sake of the tire tread-life.

While some tires may be slightly more resistant to irregular wear, overtime even the most expensive, premium tires will be replaced early compared to tires on a well maintained and correctly aligned vehicle. Any tire professional or service technician can identify wear patterns on a tire tread associated with mechanical issues. Similar to when tires are under-inflated, tires that exhibit these wear patterns will not be eligible for a free replacement or any sort of pro-rated credit towards a new tire.


Common Types of Dangerous Tire Defects

Tread or Belt Separation – Tread separation is actually the most common type of tire failure among steel-belted radials and can occur due to a defect in either the design or manufacture of the tire. There are many errors in the design or manufacturing process that can make a tire prone to belt separation. There are also many techniques – such as inserting wedges, cushions or safety belts – that tire manufacturers can employ to mitigate tread separation, but not all tire makers choose to take these basic safety measures. Tread failures or exposed belts can cause blowouts or loss of control of the vehicle, as well as rollover accidents, which can cause catastrophic injury or fatality to vehicle occupants.

Bead Failures – We all know it is important to keep our tires properly inflated and that underinflation can cause poor gas mileage or lead to a flat tire or blowout. But few people understand the dangers of over-inflation. Manufacturer recommendations for tire pressure apply to tires when they are brand-new and straight off the assembly line. After some period of road use, a tire filled to manufacturer recommendations may actually be overinflated. If the tire contains a defect in the bead wire, overfilling could cause the tire to explode, which can cause serious injury or even death.

Sidewall Failures – Also known as zipper failures due to the way the tire sidewall looks after it fails, a defect in the tire sidewall can cause the tire to explode while it is being inflated, again with the risk of serious injury or death to persons near the tire at the time.


COMMON TIRE PROBLEMS

Cracking and Bulging

The Diagnosis: This usually comes from hitting a pothole, curb, or debris. Under-inflation and over-inflation put tires at a greater risk of damage from impacts. Large cracks in the sidewall that runs along the rim are either impact-related or caused by chronic under-inflation. Numerous small cracks in the sidewall or tread blocks come from exposure to the elements and age. Rubber, much like your leather interior needs treating to prevent cracking, by using a tire and rubber protectant. Bulging is what looks like a pimple in the tire, most often in its sidewall. It happens when there’s an impact that causes internal damage, but the damage doesn’t show up until weeks or months later. With bulging, you’re looking at buying a replacement and the tire should be removed from service, regardless of the cost. Eventually, it will fail.

Cupping (Also Called Scalloping)

The Diagnosis: It happens when worn or damaged suspension components cause the tire to bounce as it travels, coming down harder on some spots of the tire than others. Bad shock absorbers are the usual cause, though anything that connects the wheel to the rest of the car could be a culprit. Be careful with your diagnosis, though. Even tire shops sometimes incorrectly identify feathering or heel-toe wear as cupping. A wheel that is out of balance may also cause cupping or bald spots to form, though there will be fewer hills and valleys than you’d see with cupping caused by a failed shock absorber.

Heel-Toe

It Looks Like: Feathering, only the ramps run front-to-back along the tire rather than side-to-side. The leading edge of the tread blocks will be worn smooth while the trailing edge will be sharp. The Diagnosis: “[It’s] definitely one of the most common conditions we see,” “Because it’s so common, a lot of people think it’s normal.” Heel-toe wear is typically a symptom of insufficient tire rotation intervals. So check your car’s maintenance schedule and make sure you keep up. Misalignment or worn or damaged suspension bushings, ball joints, and wheel bearings can also cause heel-toe wear.

Feathering


When Operators Fail in Inspection and Proper Maintenance

The majority of truck tire failures are preventable. Truck owners and operators are required by law to routinely inspect and properly maintain vehicle tires.

However, sometimes inspections are completed hastily or not at all, and maintenance, when performed, often fails to address the full scope of a problem. In these situations, important issues can be missed, and vehicles that aren’t fully safe are taken on the road. Failed inspections and maintenance often miss common, fixable problems, such as:

  • Excessively worn tires. Tread depth violations were among the most cited during roadside inspections in 2015. Experts recommend replacing tires when they reach a 4/32-inch tread depth. Violations are issued for a depth of less than 2/32 inch.
  • Improper tire inflation. Over- or under-inflated tires make it more difficult to safely drive a commercial vehicle. Under-inflation also increases the risk of tires overheating.
  • Mismatched tires. In some cases, operators replace only one tire on an axle. Tires of a different size and/or wear affect the stability of a large truck. Different tires also place uneven pressure on the other wheels and mechanical parts, causing trucks to be more prone to rollovers and impacting a driver’s safe distance reaction time to avoid an accident.
  • Overloaded tires. Tires are meant to bear certain weight. When a truck is overloaded, too much pressure is put on tires, increasing the chance of under-inflation, overheating, and blowouts.
  • Bias and radial tires on the same axle. Experts do not recommend mixing bias and radial tires, because they have different structures. Therefore, they wear and handle differently. Mounting them together causes uneven wear and instability.

Finding The Best Long Distance Moving Quotes

Must Read Long Distance Moving FAQ

Planning a long-distance move is stressful, and you probably have a lot of questions, especially if this is your first time. Although there are benefits to your average long distance moving guide (complete with overly complex check lists) sometimes you just want a few solid yet simple answers. If that sounds like you, then it’s a good thing you happened upon Liberty Movers: the long distance movers who know how to take your important questions and provide answers that actually help you!

When is the best time to conduct a long distance move?

There are great perks to moving any time of the year, so deciding what time is best depends on your individual priorities. For example, moving during the spring and summer is great because you can take advantage of your children’s vacation time, and moving when the weather is nice can be preferable. However, moving during the fall and winter might be cheaper because you benefit from off-season rates.

How do I pack for a long distance move?

Ideally, you will choose to have your belongings packed by professional long distance movers. This way, you know your valuables are well protected each step of the way. However, if you’re a DIY type, then it’s a good idea to learn some expert packing tips. To get started, here is a basic list of supplies you will need to pack for a long distance move—and a few tips while we’re at it!

Sturdy moving boxes in various sizes: Never over-pack boxes and always fill gaps with packing paper.

Packing paper and bubble wrap: When packing glassware, fill openings with paper before wrapping.

Packaging tape and labels: Never load boxes that are not tapped shut, and detailed labels make finding your items later much simpler!

Moving dolly: Don’t try to move those heavy furniture items and appliances without a moving dolly.

Are there items I cannot pack when moving long distances?

Unfortunately, yes. Your moving company will provide an extensive list of items that are banned including perishables, aerosols, propane cylinders, paints, and more. The goal is to provide you with a safe and efficient relocation, and sometimes that means leaving a few items behind.


Essential Long Distance Moving Tips

Invest in Quality Moving Supplies

The first among our long distance moving tips concerns supply quality. Don’t cut corners when buying boxes and moving tape. Your boxes must hold up as they are being moved and shuffled in the truck. Cheap boxes can start to bend and break, causing damage to the items inside.

Inspect Furniture and Other Heavy Items

A close inspection of some of the large items in your house can help you determine what stays and what will go. For example, if you have old furniture that needs to be replaced, then it might make sense to get rid of it now and buy new furniture at your destination. It isn’t worth the space and cost of moving these big items across the country.

Purge Unnecessary Household Items

Have you noticed that your house feels overloaded with clothing, toys, and other household goods? A few new things here and there can really add up over the years. Since you are preparing for a long-distance move, it is a great time to decide what you want to keep and what you no longer need.

Careful, Deliberate Packing

With a long-distance move, your personal belongings won’t just be loaded into the truck and unloaded at the new home. These boxes will also be riding in the truck for long stretches of road. With all of the handling and driving, there is a risk that items might be broken or damaged.

Foods and Liquids

The next in our list of long distance moving tips is food items and liquids. It’s not a good idea to pack liquids or foods because these items can attract pests or cause a mess. If you decide to bring food from the pantry, it should be unopened and preferably in sealed cans or plastic containers. Open bottles and liquids can be problematic if they break or spill because the contents can damage other items in the truck.


PACKING TIPS FOR MOVING LOCALLY OR LONG DISTANCE

HELPFUL PACKING TIPS FOR MOVING

You have a million things to take care of before your next move – from changing your address on all your important accounts to figuring out which furniture will fit in your new place.  Here at Able we feel it can be very helpful for customers to be aware of important packing tips for moving.  If you’re making a long distance move, you’re looking for new doctors, sports clubs, churches, schools, and trying to figure out what your new community and neighborhood are like.

You have a running list of everything you have to do before you move, especially if you’re changing jobs or leaving friends and family behind. It can easily get overwhelming, and one thing that happens to everyone is that time speeds up!

It’s easy to let yourself feel like you have enough time to get your packing done after you tie up loose ends elsewhere. Moving can be very stressful, and often coincides with other major life changes that can add to undue stress. Packing boxes at the last minute under duress does not lead to a harmonious arrival in your new home.

Give yourself time – Estimate how long you think it will take you to pack everything (from your wardrobe to the treasures in your attic). Then, to be safe, double it. With all the other things you have to take care of, giving yourself plenty of time for packing will ensure that you have everything done long before the moving truck arrives.

Reduce your load – If you give yourself enough time to prepare before packing, you have the opportunity to narrow down what you need before you move, saving you time, energy, and often money before you even start packing.  Part of our suggestions on packing tips for moving are designed to help when it comes down to this question…. how do you decide what you need?


Plan Carefully for Your Move

Moving from one home to another is considered one of the most stressful things people do in their lives; when your move is across the country rather than across town, the stress is increased tenfold! Long-distance moving involves careful planning and organization on your part and on the part of the company you pick if you hire movers. Is the company you pick going to do a good job? Would you be better off renting a truck and doing it yourself? The following long-distance moving tips are not going to answer all of your questions, but they’ll be a good place to start your move on the right track.

Do-It-Yourself or Hire Movers?

While those who are rolling in money probably won’t have a difficult time deciding whether or not to hire movers, the rest of us are stuck with the same choice every time we relocate. Of course, picking up and settling in will produce fewer backaches if you hire movers, but thle price tag and the added worry of whether or not your movers will be careful with your belongings can sure add to the headaches!

DIY Long-Distance Moving Tips

If you decide to go the less expensive route, there are a few things you can do to make your move go more smoothly. First and foremost: plan your packing! The only thing worse than over-exerting yourself during a big move is over-exerting yourself AND breaking or misplacing some of your belongings in the process. Large boxes are great for pillows and blankets, but for just about everything else, you’ll want to stick to smaller, more manageable dimensions. Also, make sure that you have plenty of packing material and a way to clearly label your boxes. Always pack one room at a time, and keep the boxes from each room together when you load them; this will be a huge help when it comes time to unload!

Long-Distance Moving Tips when You Hire Movers

The most important thing to remember when you hire movers is this: a company you can trust is worth a little extra. Now, this doesn’t mean you should go out and hire the most expensive movers you can find; what it does mean is that you should get several quotes from several different companies and pick the one that you feel will do the best job rather than the one that charges the least. Good communication is a key element of working with movers, and when you find a company that you feel comfortable communicating with, you’re more likely to have a good experience. If a particular company leaves you feeling uncomfortable before they load a single box, there’s bound to be trouble ahead; on the other hand, a company that quotes a little higher but is quick to answer any questions you have and makes allowances for your specific needs is likely to provide great service through the entire moving process.

Moving Checklist & Other Tips

Gather your supplies. Make sure to stock up on assorted boxes, scissors, tape and other packing supplies. A grocery or liquor store will have extra boxes for free.

Set up a packing center. Keep your boxes, scissors, tape and other packing supplies in one area.

Label boxes. Keep your box labels simple. It’s a good idea to stick with three categories: load, don’t load, load last and fragile.

Pack one room at a time. Only focus on one room at a time. Packing multiple rooms can lead to confusion and reduced efficiency.

Keep packing tools together. Keep your packing center together and move it from room to room. This will help you avoid lost tools.

Plan ahead. Certain items like plants require some forethought. Be sure to factor harder-to-pack items into your plans.

Move difficult items together. Fragile items will require a special trip. Be sure to set aside the time to move special possessions.


Long-distance relocation services

Have you moved to a long distance location before? Or are you considering moving to a new place that requires traveling for long? It is necessary for you to know that long distance moving is not as easy as it looks. I am yet to see someone that ever says long distance moving is less stressful.  It is a tremendous job. The only thing I can compliment about the long distance move is that it can really be fun if you have the right long distance company helping you move your goods.

Find the best long distance relocation services

It is really not difficult to discover the best relocation companies in the United States of America.  There a numerous long-distance relocation companies around the nation and all in different sizes and shapes but the important thing is finding the best and reliable company to trust when helping you move your properties and to make sure they provide the following services

Storage

Storing of goods when moving long distance is very necessary. Long distance company movers pack goods in ways for it to survive long distance moving. They make sure that your goods are well packed and sealed in a very good box. Most times, extra storage facilities are needed for your goods to be very safe and accounted for.

Full Packing

Long distance moving companies have movers that help you pack your loads and goods fully without making you stress your self. The only thing is that you might need to pay the additional cost for the service renders by the movers, but be sure that your goods will all be moved carefully.

Special moving

Moving of special items requires an expert touch. When you choose the best moving companies to help you relocate your goods, you can rest assured know that all your personal belongings will be packed professionally, with maximum safety by a team of professionals so that you won’t have room for complaints when moving.

Choosing The Right Stucco Repairs Company

Guide To Stucco Repair Done Right

Black mold, wood rot, decay, and water damage have all been found behind improperly installed Stucco. If your stucco wall hasn’t been installed the right way, it will likely fail. Most Sun City residents are very familiar with the class action lawsuit that settled on April 18, 2019 for just north of $43 million. Now that the lawsuit is over, many residents are focused on making the proper repairs to keep their homes safe, free of health hazards, and protected from further water damage.

Once news of the original stucco delamination made its way through Sun City, residents like Connie Sehlinger began to assess the likelihood of serious issues with her own home. Connie took quick action in order to avoid a more expensive, and potentially dangerous problem.

After receiving a settlement from the lawsuit, Connie thought “I’ve got this money. I’ve had this house checked twice, and I better have it checked again before I decide to take a vacation with this money.  I may have to use it for the side of the house. Which is exactly what happened.”

Spring Construction: The Lowcountry Stucco Experts

One of the area’s most accomplished stucco contractors, George Hutchinson, owner of Spring Construction has been working in the Lowcoutry for 15+ years.

Connie hired George and Spring Construction for several reasons, including his expertise, competence, ten-year transferrable warranty, referrals, and his polite and trustworthy demeanor. But, before George began working on Connie’s home, he thoroughly assessed Connie’s potential for water damage.


STUCCO REPAIR

PROTECT YOUR PROPERTY WITH STUCCO WALLS

Your stucco walls have been providing your home with a beautiful protective exterior surface for many years, but when the time has come that they need repair

Thankfully, one of the significant benefits to stucco as a building material is that it is extremely repairable

Although extremely weather-resistant and durable, over time, stucco will be susceptible to damage. A properly applied coat of stucco should last decades at a minimum, but when large cracks start to develop, it is important that you act quickly before more of the wall becomes damaged. Serious stucco damage is nearly always caused by water intrusion into the interior of the wall, which can be caused by improperly installed stucco, previous amateur repairs, or simply the passage of time.

PROFESSIONAL STUCCO INSPECTIONS

Part of the way we like to add value to our company’s services is by offering our clients up-front, no-obligation quotes. Get in touch with us to book a complimentary professional stucco inspection.

We’ll send a certified professional to your property at a time that’s convenient for you. With our trained eye, we’ll investigate the extent of the damage, being careful to check for any signs of a mold problem beneath the surface


Stucco Repair

Stucco is the first thing that comes to anybody’s mind when thinking of building a home.  Stucco has been around for some time and is here to say thanks to the beautiful finish it can give the exteriors.  Though long-lasting a stucco siding requires regular maintenance to retain its sheen.  Installing stucco might not be complicated, but it is a work that should be handled only by expert stucco contractors.

handling stucco repair and installations around the area and popular for top-quality stucco repair services. The testimonials of our countless satisfied customers vouch for the claim that we are the best stucco repair contractors in the town. We have handled stucco repair projects of all kinds from minor stucco patch repair to complete stucco redoing.  Our exposure to different types of stucco and designs ensure that we understand stucco in and out and so any project we take up is completed to perfection.

​Stucco is our passion. We offer our customers a range of stucco repair services to choose from. It can be a minor stucco crack repair or a stucco foam installation or a complete stucco installation

Hardcoat Stucco Repair

​The composition of hardcoat stucco makes it more resistant to water damage. It is porous and hence doesn’t retain water. So, it is a recommended product in moisture-prone areas.  Though chances of water damage are less, hardcoat stucco requires maintenance on regular basis. Else it might develop cracks on the surface, and stucco cracks even if minor shouldn’t be ignored. We provide the perfect stucco crack repair service for any cracks on your hardcoat stucco. The cracks that you see on your walls might be because your stucco was not installed properly in the first place. That is why it is always recommended to get an expert stucco contactor to install your stucco. Just imagine the time and money you could have saved on the stucco crack repair that keeps occurring because of the wrong installation

EIFS Repair

​Do you know the best way to determine the type of stucco you have installed? Just tap the same, and you would get an idea. EIFS (Exterior Insulation and Finishing System) will sound hollow because it is lighter in nature.  However, the biggest drawback of EIFS is that it retains moisture and develops water damage issues faster than hardcoat stucco.  Stucco contractors get more calls to repair stucco cracks in EIFS than in hardcoat. Apart from its water sensitivity EIFS is also softer than a hardcoat, hence dents and exterior damages are more frequent in EIFS. Painting and stucco patch repair are usually recommended for such exterior stucco repairs. An expert can guide you in choosing the ideal paint for EIFS considering its water sensitivity, hence please ensure that only good stucco repair companies handle your EIFS stucco, because the complaints are more frequent in EIFS. So, if not dealt with prudently your minor stucco crack repair might cascade into a major one. Assign your stucco repair service to us for making your EIFS stucco as good as new.


Why Patching Or Painting Your Stucco Can Be Dangerous

Patching or painting your stucco can be very dangerous and if done incorrectly, may lead to structural damage and expensive repairs. Unlike other home building materials, cracks in stucco should not be painted over or quickly filled in because there is always the possibility of covering dangerous water damage that may threaten the structure of your home. This is very dangerous and a lack of experience may lead to far more serious issues, which is why it is always better to hire a professional stucco contractor to complete inspections and repairs of stucco for you.

Stucco homes are beautiful but will experience wear and tear from different elements over time, especially in temperamental climates. Moisture and cold can both cause problems and the continuous cycle of warm and cold weather will cause stucco to expand and contract, resulting in cracks. As water and ice enter these cracks, they will become worse over time and allow moisture to enter right into the walls of your home, which will lead to mold and rotting and this is one of the reasons why you cannot just patch or paint over stucco, no matter how tempting and easy it may sound. Cracks may be an indication of a much bigger and more serious underlying problem, like water damage, and if that is the case, it must be looked at so that the proper repairs can be made.

Reaching for paint or caulk whenever you see cracks in stucco may seem like a good idea but in reality, it is not because you’ll only be covering up a problem instead of fixing it and this can be both problematic and dangerous. Patching or painting over stucco is a lot like ignoring the underlying problem while creating a larger one and you need to remember that both painting and patching are temporary cover-ups and not actual solutions, so if there is existing water damage already in your stucco, then the paint will only peel and crack again. No amount of patching or painting will prevent future cracks and if the root of the problem is not fixed, then you’ll just be wasting your time.

Many people think they’re doing the right thing by filling in the cracks so that moisture cannot get in but they forget that this can seal in any existing moisture, which is something you definitely want to avoid because that moisture will seep into the wood frame of your home’s structure and lead to rotting. Moisture will affect other porous materials of your home’s structure as well, so it’s a very dangerous situation that you want to prevent from happening.


REPAIR YOUR HOME’S STUCCO

Make the Stucco of Your Home Last for Years

With repairs and regular maintenance, you can make the stucco on your home last for years. If you have noticed moisture seeping through the walls has begun to damage the stucco—causing it to either crack or deteriorate, it is time that you contacted our team. Beyond just repairing the stucco though, our team can also address any issues with hard water that may be coming from your plumbing system. This hard water can damage your home’s plumbing, which can lead to leaks down the line and further wall damage.

Your deck or patio is an outdoor extension of your home. But being exposed to nature, it needs regular maintenance and repairs to keep it a safe, pleasant place for entertaining guests

Doors are the entry and exit points to many areas in your home and they should always work correctly and look great. Whether you need repair services because your door doesn’t work or look like it used to, or you’re ready to have a brand-new door installed

Toilets, Screen Doors, Drywall, Tile & More

When stuff breaks, we fix it. Our home repair contractors can save you the time and money it would otherwise cost to find and install a replacement for your broken fixtures and household items. We believe in a convenient, one-call solution where one call can get one of our house repair contractors on the way to fixing whatever you need fixed.

Why LED Electrical Lighting Are Popular Now

LED Lighting

The operating life of a light emitting diode (LED) is unaffected by turning it on and off. While lifetime is reduced for fluorescent lamps the more often they are switched on and off, there is no negative effect on LED lifetime. This characteristic gives LEDs several distinct advantages when it comes to operations. For example, LEDs have an advantage when used in conjunction with occupancy sensors or daylight sensors that rely on on-off operation. Also, in contrast to traditional technologies, LEDs turn on at full brightness almost instantly, with no delay. LEDs are also largely unaffected by vibration because they do not have filaments or glass enclosures.


Reasons Why My LED Light Bulbs Aren’t Lasting

LED light bulbs typically boast an impressively long lifetime. It’s one of the many features that makes them worth the extra quid, but what if you find that your LEDs are burning out before their time? You’re trying to make the transition to energy efficient lighting and you’ve followed the guides, but the bulbs just aren’t lasting as long as they’re supposed to. It’s a frustrating experience and it can be hard to determine where the situation is going wrong, but we can help you avoid it by shining a light on what could be causing these failures:

Dubious dimming components

LED light bulbs are dimmable, with two caveats:

  • They have to say they are dimmable on the package. This indicates that they were specifically built to be dimming-capable.
  • They have to be connected to an LED-compatible dimmer switch.

Standard LED light bulbs aren’t equipped with the components for dimming, and old dimmers just aren’t built for the low wattage of an energy-efficient LED bulb. While an old dimmer switch may work for a while and a standard LED light bulb may still technically dim, at some point you will run into problems with high-pitched buzzing or whining noises, flickering, and premature light bulb burnout.

SOLUTION:

Select light bulbs that specifically state they are dimmable and upgrade to an LED-compatible dimmer switch:

High voltage

If you find yourself burning through multiple light bulbs throughout your home in the span of months, or you notice the bulbs burning more brightly than they should, the mains to your house might be too high. In the U.K., the electricity entering your home should fluctuate around 230V at 50 Hz. If it is consistently much higher than that, the overpowered voltage will cause any type of light bulb to burn out faster than it should.

SOLUTION:

If you suspect this is the issue, have an electrician test the voltage in your home or contact your electrical provider to have it corrected.

Overheating

Unlike incandescent light bulbs, LEDs don’t produce light using heat. This is part of what makes them so energy efficient. The downside is that their components can be sensitive to overheating, which can cause them to burn out prematurely. LEDs can overheat if they:

Are used in enclosed fixtures but aren’t designed for them (packages usually specify what types of fixture a certain bulb is ideal for).

Are too large for the fixture—just because the base fits, doesn’t mean the bulb should be there.

SOLUTION:

Select LED light bulbs that are the right size for your fixture so it gets proper ventilation, and only use bulbs rated for enclosed or semi-enclosed fixtures in places like recessed lighting fittings.


LED’s Sound Good, But They are Too Expensive”

The many pros of LED lighting are often overshadowed by a single myth; LEDs are expensive! Simply put, an LED bulb can cost a few dollars. Earlier models were very expensive. LEDs have been around for many years now and they are readily available at all price points. It can be hard to justify retrofitting to LEDs when you still believe this myth that LEDs are too expensive. With improvements in manufacturing, increased market saturation and rapid-development of LED technology, the benefits of an LED upgrade supersede all alternatives.

Details

The Light Emitting Diode (LED) itself is the most efficient lighting technology yet.

LEDs effectively emit light in specific directions instead of scattering it to all spaces, reducing light pollution.

Incandescent lamps waste up to 90% of their energy as heat. LEDs waste very little energy.

In certain conditions a single bulb can last over 20 years. This cuts labor hours of maintenance, costs of replacement bulbs, and of course the savings on the utility bill over that time will make up for the initial cost.

Solution

This LED lighting myth is easily avoided with smart planning. Many utility companies offer rebates as an incentive to upgrade to LEDs. There are other incentives offered for commercial properties who are upgrading to LED fixtures as well. Rebates for well designed projects that save a lot of energy can add up quickly and take thousands of dollars off the cost of a light retrofit project.  Ask your lighting professional if project or equipment rebates for lighting are available in your area.


How to install Solderless connectors for LED strip lighting:

  • Cut along the mark line, and tear a little bit of 3M backing tape from the mark. 
If 3M tape is not peeled off a little, it will be harder to insert the strip into the connector.
  • Lightly pull the black plastic lock out from the solderless Pulling too hard may damage the LED solderless connector.
  • Insert strip into the solderless connector. There are two sides to the connecting tray – make sure the wider of the white sides faces up. This is the top.
  • Make sure the soldering pads fully touch the conjunction metal.
  • Push the plastic lock back towards the middle into the lock position. Be gentle and make sure the mounting tray is securely closed or the lights will not light up. Double check the markings of (+) and (-) to make sure which color wire corresponds to each.
  • For long term use, try and use liquid tape or a bonding material to make sure the connector does not become loose.


Do LED Lights Create Fire Risks?

LED lights do not emit light from a vacuum as most other bulb types do. The illumination is provided by something solid known as a semiconductor. If you are considering changing to LED lights, whether you are looking at a retrofit of full fit solution, you will see whole lists of benefits for changing from incandescent or fluorescent bulbs. These tend to focus on the cost savings and the environmental friendliness of LED, but it is also important to note that they have a much lower chance of causing a fire.

Overheating is one of the reasons a bulb could start a fire, but that is highly unlikely to happen with LED lights. They may feel hot to touch, but they produce light at a significantly lower temperature than other bulbs. Traditional bulbs use a filament, which loses a lot of energy through heat emissions, and incandescent bulbs generate heat as infrared radiation.

The fact traditional lights radiate so much heat has meant they are sometimes used as heat sources themselves, poultry incubation and heaters for reptiles being just a couple of examples.

As LED lights do not affect the ambient temperature they are ideal for small, confined or temperature-controlled areas.

Less Heat, More Light

One of the reasons LED lights have such a long-life span is because the technology in place uses a heat sink, located at the bulbs base. This draws most of the heat to one area and keeps the electronics relatively cool. An LED light in its hottest part is approximately half the temperature of a halogen or incandescent bulb but emits the same amount of light. Traditional lights lose between 60 per cent and 95 per cent of their power to heat, so are far more likely to be a fire risk than LED lights. They hold their heat internally and use the bulk of their energy to produce light.

Could Retrofit LED Lights Be Your Solution?

If you are concerned about the state of your lights, or if they are near fabrics or materials that are easily combustible, you may be considering changing your lighting system to LED lights, but you could be worried about the installation costs.

All You Need To Know About Chiropractor

Massage appointment helpful tips

Scheduling an appointment

It is important that we know as much about your preferences, health situation and past massage experience as possible. If you are looking for a specific type of massage, deep tissue, relaxation, etc., be specific so we can pair you with a therapist that does that type of massage. Please inform us if you are pregnant, or have any major health conditions. We will ask you specific questions when making your appointment to help customize your session to meet your needs.

Preparing for your appointment

Personal hygiene is always important when you come in for massage. Shower or bathe prior to your massage. Wear comfortable clothes that allow you to undress and dress easily. Your comfort and privacy are important to us. You may undress to a level that is comfortable to you (most clients are nude, or underwear only). Therapists are trained in the proper draping techniques, and only expose the area that is being worked on. Your privacy is always respected, and it is never required that you completely disrobe.

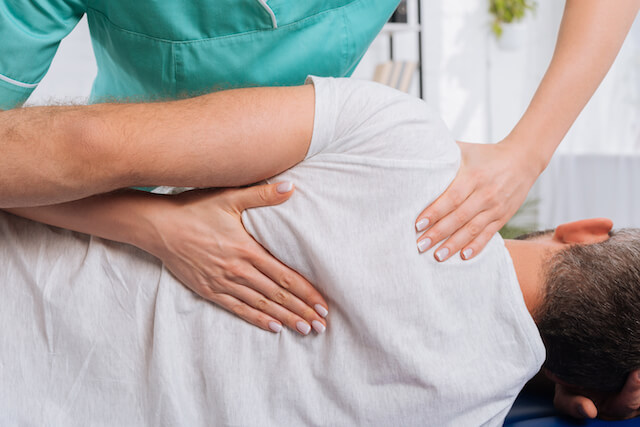
What is Chiropractic Care?

Chiropractic is a natural, safe, drug free, hands-on form of health care. The basis of chiropractic is that the nervous system directly or indirectly controls every cell in the body. The nervous system is made up of the brain, spinal cord and nerves. The brain communicates through the spinal cord and nerves, and the nerves branch away from the cord between each vertebra. A misaligned bone may cause irritation of the nerve. The nerves go to the muscles and organs and influence the cells in your body. So when the nerves are irritated it may lead to pain, muscle tightness or other health problems. This misaligned bone is called a subluxation

What can I expect of a visit to the Chiropractor?

On your first visit you will begin by filling out paperwork.  You can find forms located in the left hand side bar on this page.   Those forms may ask about any current health problems, past health history, family history, and request information that is used for billing purposes. Your doctor will review the paperwork and then ask you questions regarding this information and any additional information he/she may need to determine your health problem. The doctor will then do a physical examination that involves various tests to help determine your diagnosis. This may include x-rays and/or lab work. After reviewing all the information, the doctor will determine if chiropractic care can help with your health concerns. They will discuss your diagnosis and the treatment plan they recommend for you. If you are comfortable with this plan, the chiropractic treatment will be performed. This treatment usually involves a chiropractic adjustment. It may also include heat, ice, ultrasound, electrical muscle stimulation, acupuncture, nutritional counseling, exercise recommendations, massage therapy, and/or stretches.

Which forms do I use for my appointment?

We have provided forms for you to print and complete prior to your appointment.  See the left side bar for those forms.  If you cannot or choose not to print forms but want to review what information you will need at your appointment you can do so.  If you have never been a patient in our clinic you will need to complete the new patient appointment forms.  If you have been a patient in our clinic in the past and it has been more than 4 months since you have been seen, you will need to complete the update patient appointment forms. If you were involved in an auto accident or work related injury you will also need to complete the applicable form for the type of accident you were involved in.  If you print and complete forms be sure to bring them along with you to your appointment


Helpful Tips

DOT Physical Exam: Things to Plan in Advance

If you have a medical condition you’re going to need some paperwork:

Diabetic Condition – Bring a list of medications and name of prescribing doctor.

High Blood Pressure – Bring a list of medications and name of prescribing doctor.

Heart Condition – If you’ve had a heart attack or cardiovascular disease, you’ll need to bring a copy of your last stress test.

Sleep Apnea – Bring a copy of your latest sleep test results, if you have one.

Medications – List all the prescription medicines you take, including strength and dosage. If you regularly take over-the counter medications, such as antacids or allergy pills, list them, too.

Contact information – Have names and phone numbers of your doctors in case you need to call and have them fax missing information.

DOT Physical Exam: Things To Do to Manage Your Blood Pressure

Make sure you don’t run out of your prescribed blood-pressure medication.

Remember to take your medication on schedule. If you forget, most doctors recommend taking your medication as soon as possible.

If you’re significantly late taking your medication, tell the doctor conducting the DOT physical you forgot to take your regular medication. If your blood pressure is too high, ask to have it rechecked later that day – or even the following day.

Cutting back on caffeine and nicotine can help improve your blood pressure.

Reducing the amount of salty foods you eat and avoiding adding salt to your food can also help to lower your blood pressure.

The week before your DOT physical exam, cut back on coffee, sodas, energy drinks, potato chops, etc, and don’t add salt to your food. Also reduce your use of nicotine as much as possible. Doing this can help lower your blood pressure reading

The Day of the DOT Physical Exam:

Remember to bring the medical records you’ve prepared in advance, including your list of medications.

Remember to bring eye glasses (it’s surprising how many people forget this).

Drink water. Come with a need to pee.

Getting Past ‘White Coat’ Syndrome:

First off, we understand that this is a very real concern for some drivers.

Secondly, we work with drivers all day long. We understand that passing your DOT physical exam is important to your continued career and your livelihood


Tips for a Healthy Summer!

Summer is full of activity. Whether it’s volleyball with friends, vacations with family, or just spending all day on the move, we tend to be much more active during the summer months. While this is actually very good for overall health, it can cause pain for those of us who are not used to it. This is where chiropractors can really help. They can ease pain in the back and neck by reducing restrictions of the vertebrae of the spine. By removing these problem areas, pain is reduced and activity and movement become much easier. Having the best summer is more than a schedule crammed full of outdoor activities. It’s staying healthy and fit, too

Keep hydrated.  Plan on drinking fluids at least one hour before you head out for the day. Aim for half your body weight in ounces a day.  Drinking enough water per day to keep the kidneys functioning properly and flush toxins from the body. Add some variety to your water by infusing it with fresh fruit — delicious, nutritious and hydrating!

Add daily exercise to your summer routine. This winter’s cold weather was a valid reason for not getting out as much for outdoor activities. Now that summer is here, there is no excuse! Hiking, biking, running and walking are all great ways to boost energy and fitness levels. Gardening can be a great workout, too!

Support our local farmers and your health too! Farmers markets are open. Treat your family and yourself to fresh organic fruits, veggies, honey and herbs. Farmers markets often offer an amazing array of produce that are not typically available in your local supermarket.

tick to your regular wellness schedule.  There’s no vacation when it comes to your health! Keeping up with your visits helps maintain structural alignment, promoting optimal health and range of motion that helps you to do the summer activities you love. Massage and acupuncture can help soothe sore muscles from summer sports and gardening. Going long stretches without chiropractic care can set you back – which means more extensive care down the road. Don’t be a stranger this summer!


SPINE HEALTH TIPS FOR HOLIDAY ROAD TRIPS

Whether you’re sitting in a car for too long or working at a desk job, sitting causes a lot of pressure on your lumbar spine. For those of you who are traveling more than an hour away, it’s important to keep your spinal health in mind. In fact, sitting for too long – especially with improper posture – is a leading cause of back pain and issues.

Use a lumbar pillow. To help relieve some of the pressure, you can use a lumbar pillow. This pillow will help improve your form too. If you don’t have a lumbar spine pillow, try using a folded up sweatshirt. Place it in the small of your back to help keep the natural curve in your low back. Use either of these lumbar support options for as long as possible.

Schedule stretch breaks. Schedule rest breaks every 1 to 2 hours. Instead of pulling through a drive thru, hop out of the car and go inside. Spend 5 to 10 minutes walking around and stretching out your back, legs, neck, and arms.

Maintain good posture. While you are traveling, be mindful of your posture. Scoot toward the end of your seat and point your toes and knees inward. This posture will force you to sit up properly and make sure your spine is properly aligned. This tip is more ideal for a passenger as opposed to the driver. Always be sure you are safe while driving

Give your neck a break. If you’re a passenger, do you spend a lot time on your phone playing games and stalking people on Facebook? I know I am guilty of those habits!  Looking down at your phone or book for too long can create neck pain after a long drive. You could also experience headaches or shoulder aches. Set aside “device free” time on the road. Use a neck pillow to stay comfortable and maintain good form.


Tips for Travelling

Trips away are always fantastic and looked forward to all year however all too often I see patients in pain when they return. Frequently patients complain of neck and lower back pain after travelling; here are a few tips to help you whilst you are away

Bring your Own Supports

If you know you are prone to suffering spinal pain when travelling be proactive

Use a neck pillow or lumbar cushion to support your spine

Take your own pillow when you go away

Do the exercises your chiropractor has given you

Use a hot shower to mimic a heat pack whilst away

Lifting Luggage

Bend at the knees

Use your low back muscles, not your spine to lift

Don’t twist when lifting or carrying

Carry backpacks on both shoulders

Pack light, just bring what you need

Move Move Move

Don’t get stuck in one position for too long

If you’re on a plane get up every hour and walk around

If you’re driving stop every two hours and go for a walk

Try to maintain good posture, head and shoulders back, don’t slouch

Hydration and Nutrition

Drink plenty of water

Eat well, plan ahead and avoid junk food

Professional Squirrel Removal

How to Get Rid of Squirrels

There are several species of squirrel, but tree squirrels are the most common nuisance for homeowners because they inhabit attics and garages and cause damage. They often gnaw on the exterior and interior walls, timbers, cables, and electric wiring. They have been known to short out electric power transformers due to their activities around power lines. Squirrels are typically discovered because they make a lot of noise in the area they inhabit. The gray squirrel is the most common structure-infesting squirrel species.

Squirrels are abundant in the wild because their numbers far exceed the number of predators. The large population and decreasing natural habitat due to construction in many areas cause them to seek shelter in houses. The chilly months of fall and winter cause squirrels to seek the warmth that is found in attics.

Squirrel Control Recommendations

Removal of any diet source: bird seed for example, because they attract the squirrels is the first order of business.

Using gutter guards and covering downspouts will reduce the number of squirrels that are entering through the rooftop and facia boards.

There are no poison baits on the market that squirrels will eat and die, except Ditrac Ground Squirrel Bait that is only made to control the California Ground Squirrel (found in western states). Typical rodent control bait for mice and rat control will not work against other squirrels.

Live trapping method of trapping squirrels is the only way to remove unwanted squirrels. Catching a squirrel is really the only way to get rid of squirrels in your attic, once they have chewed holes. It is important to seal up and repair all entry points after trapping the squirrels, so they no longer have access.

Trapping Tips

Always use work gloves when handling the traps with a squirrel inside.

Some trappers like to use a technique called “pre-baiting” to gain the squirrel’s confidence. Leave the trap out, wired open (so it won’t shut) with the bait so that they can get used to the object in their environment. However, most of the time this technique is not needed to trap squirrels successfully.

Place traps where you hear or see the activity. Using a Rat/Squirrel lure (walnut/nut oil based) on a cracker or piece of fruit behind the trip pan is very helpful as a lure. You may also try peanut butter. Next use sunflower seeds on top of that and trail a line of sunflower seeds out the front door of the trap so that there are “free” seeds a couple of feet in front of the trap. This will help overcome any anxiety the squirrels may have about entering the trap.

Exclusion and Relocation of Squirrels

After trapping and relocating the squirrels you can seal the openings with 1/4″ mesh hardware cloth or metal flashing. Look for all possible entry points. If you are not handy with tools, many nuisance wildlife control companies will seal entry points with a year’s guarantee for a fee.


TIPS FOR HOW TO GET RID OF SQUIRRELS IN THE YARD

Squirrels can be a nuisance in the yard or garden by eating fruit, vegetables and birdseed and chewing tree bark. Squirrels also have a way of making their way into your attic or crawlspaces and setting up nests. Here’s how to get rid of squirrels in the yard and keep them out of your home.

Don’t feed them. If you feed them, they will come. Any food found in your yard is fair game for roaming creatures or those already calling your property home. When you’re hanging bird feeders, scattering plant seeds or throwing compostable food scraps into your garden, you create the opportunity for easy meals. You should weigh your enjoyment of bird watching with the potential to attract pests with uneaten birdseed.

Remove what attracts them. The sight and smell of fallen fruit, nuts and seeds lures squirrels. Rake your yard regularly to remove these items from under bird feeders and trees. Use garbage cans with tight-fitting lids to keep squirrels out of your trash.

Scare them. A dog or cat may keep squirrels out of your yard, particularly if your dog chases squirrels. If you don’t have a cat or dog, you can place plastic owls around your property on elevated surfaces such as fence posts or the roof to frighten squirrels away. You can also buy containers of predator (wolf or tiger) urine to spray in your yard or garden. The scent scares many animals, including squirrels, deer and rabbits. You need to re-apply the solution after it rains.

Spray them. Motion-activated sprinkler systems may help keep squirrels out of your yard.


How To: Get Rid of Squirrels

Most of the time, squirrels are completely benign, but in some situations, they can cause considerable damage. If you want to put an end to your squirrel problem, don’t miss our five-point action plan.

Don’t let the bushy tails fool you. They may be cute and and bright-eyed, but if left unchecked, squirrels can do an impressive amount of damage, not only to your garden, but also to your home (particularly the attic and eaves). While there’s no quick and easy way to get rid of squirrels, you can do a number of things to slowly shoo away these mischievous creatures. Whether you’re responding to an existing squirrel problem or seeking to prevent one, read on for a five-step action plan.

Focus on food.

If the neighborhood squirrels seem to be more interested in your house than in the one next door, it only makes sense to investigate the reason why. First things first, scan your property for an obvious food source, such as a bird feeder. Even if mounted on a tree or atop a pole, bird feeders are well within reach of squirrels, agile animals capable of jumping eight to ten feet with relative ease. If not going to go great heights in search of food, squirrels are just as likely to dig for it. Garden bulbs, in particular, are vulnerable. In lieu of protecting your flower beds with chicken wire, consider planting strategically placed daffodils. Since these perennials are poisonous to squirrels, they act as effective deterrents.

Prevent passage.

Everyone knows that squirrels are expert climbers. What you may not have realized is that, by banding tree trunks with plastic or metal collars (sometimes known as baffles), you can prevent squirrels from progressing along those routes that afford access to vulnerable areas, such as the overhang of your roof

Opt for odors.

To augment your other efforts, hang ammonia-soaked rags on the branches squirrels seem to favor. Doing so has proven moderately successful for Lindsay Wildlife Museum in Walnut Creek, CA. Alternatively, you can purchase and spread predator urine, available for sale at garden supply stores or home centers. The downside is that such treatments must be reapplied after every rainfall.


How to Get Rid of Squirrels

Squirrels are funny animals; however, despite the cute looks they have gained a reputation of the well-known pests. The pair of jittery squirrels can grow into an entire army of invasive pests and inhabit your property for a long time. This guide explains how to get rid of squirrels fast. Here you’ll find two best ways of controlling squirrels approved by scientists and 10 best products to help you succeed in eliminating your scurry nuisance.

The squirrels literally damage everything they can reach and repairs can get pricey. These curious and naturally inquisitive animals feel fine on your territory all year long. They feed on bird seeds, damage vegetables, and fruits, destroy your favorite flowers, and turn everything upside down in the attic

Start with the area outside your house. It is easier to chase squirrels away from your backyard rather than from the attic or any other space indoors, where rodents usually nest. Remove foodstuff: all fallen fruits, nuts, and other debris from the backyard to reduce food availability for squirrels. Tightly seal garbage cans. Trim the trees and shrubs adjacent to the house and avoid planting new ones, otherwise, their branches will turn into a perfect bridge to your house.

Inspect your house for any openings and cracks in the structure. Seal them with foam insulation or use metal mesh. If squirrels have already established their nests in your house, wait until they leave for hunting and only then block all access points. When applicable, build a fence extended 12 inches below the ground level, so that squirrels can’t get underneath.

Since the attic is a prime target for squirrels, clean it up: remove any garbage and foodstuff if you store it there.


How to Get Rid of Squirrels

They dart across the street, scurry up trees, and claw their way through small openings in homes and buildings. Squirrels are among the most widespread rodents in North America, one of the family that includes chipmunks, marmots, and prairie dogs

They have a benign, almost cute appearance with their bushy tails, short arms and legs, and pointed ears. But they can wreak havoc within the walls, crawl spaces, and attics of homes in search of shelter. As they move about, they can even harbor infected fleas and ticks that may transfer diseases.

Gray Squirrel

Though helpful in some ways to the environment, gray squirrels can be quite a pest in highly populated areas. When tree cover isn’t available for a habitat, gray squirrels will seek out telephone poles and roof lines. If they gain entry to the interior of your home, they will claw or chew at electrical wiring and wooden supports, leading to structural damage or even a power outage.

Red Squirrel (Pine Squirrel)

The smallest of the tree squirrels (but larger than chipmunks), this species is known for its territorial behavior. This species is most often home in wooded areas dotted with pine trees.

Fox Squirrel

This is the largest species of tree squirrel. With sharp claws and athletic bodies, fox squirrels are natural climbers and will spend most of their days in trees. During that time, they search for food ranging from nuts and flowers to insects and small birds. Fox squirrels build their nests during summer and endure the winter inside trees.

The Art Of Working With A Bookkeeping

A Beginner’s Guide to Small Business Bookkeeping

Part of the accounting cycle, bookkeeping is the act of tracking, managing, and recording all financial transactions for your business. If the thought of bookkeeping is frightening, rest assured, there are a variety of small business accounting software applications on the market today that make the process easy, even if you’ve never recorded a financial transaction before

Overview: What is bookkeeping?

Bookkeeping is the proper recording of all financial transactions for your business. Bookkeeping involves a lot of attention to detail; everything from properly identifying and coding invoices, purchase orders, and vendor bills, to ensuring that bills are paid promptly

What is a bookkeeper responsible for?

Bookkeepers are responsible for accurately recording all financial transactions for a business.

Why your small business needs bookkeeping

It’s next to impossible to manage your business properly without bookkeeping. Imagine trying to run your business without knowing how much you’re spending on expenses each month, or not knowing how much money your customers owe you. Imagine not accounting for those expenses properly and then trying to prepare your tax return the following year.

You need to know how much money you have

Once you start a business, you become responsible for a lot of things. As a business owner, you need to know how much money your customers owe you and how much has been received. You also need to know how much money you need to spend in order to keep your business running smoothly.


How to Choose a (Great) Bookkeeper

Finding a good bookkeeper is an investment in your business

Many small business owners see their bookwork as an obligation to stop the taxman knocking. In fact it’s an integral part of running and managing a successful business. Your accounts, bookwork and transaction history, when accurately recorded, provide an important tool for all planning and decisions you make in your business and without it, you’re running blind

BAS Agent Certification

This is without a doubt the most important thing to look for in a bookkeeper. The Tax Practitioners Board holds a register of all qualified bookkeepers in Australia. Qualified bookkeepers must prove they have sufficient knowledge, qualifications, experience, insurance and ongoing professional development to sufficiently serve their clients. It is illegal to provide BAS services including entering GST transactions, Payroll and bank reconciliations without being registered

Experience

There are some things you just can’t teach and being a good bookkeeper is one of them – a good bookkeeper should have sufficient experience to answer your questions, know their way around accounting software, know where to go to get answers to the tricky questions and know when to refer to your accountant.

Skill Set

What range of business and accounting software can they use? Do they have a sound understanding in more than just the basic MYOB and Reckon (prev. Quickbooks AU). There is a huge range of software available and in many cases these out-dated program’s may not be the most time or cost-effective software for your business. If you’re going to change things up, will your bookkeeper be able to handle it?

Education

All registered BAS agents must hold a bookkeeping or accounting qualification. You should ask a potential bookkeeper what qualifications they hold so you know their level of understanding of the accounting systems. Ensure you have a bookkeeper who understands the important relationships between transactions and Profit & Loss and Balance Sheet. Holding additional or extended qualifications shows they have a varied or higher knowledge base.


How to Choose the Right Accountant for Your Business

Deciding that it is finally time to look for an accountant is a big step for any growing business, but you will have to make sure that your financial information — one of the most important areas in your business — is in the right hands

Certification and Experience

Passing the CPA exam is a difficult process — intentionally so. While all CPAs are accountants, not all accountants are CPAs. Make sure your accountant is trained well enough to meet the expectations and demands of today’s accounting profession. Although they got through some rigorous courses and exams in the past, they should also be taking continuing education and professional development courses to remain certified, licensed and on top of changing rules and regulations within the accounting landscape

Technology

Thanks to the rapid advances in technology, accounting software has become more robust — adding automation and tons of time-saving features — transforming accounting into a fast-paced and dynamic industry. Accounting software, like Xero and QuickBooks Online, helps improve productivity by performing tedious accounting tasks while reducing one’s margin of error with a single click of the mouse

Business Growth

Finding an accountant who has an empathetic ear and can truly connect and understand your business is essential. It is crucial that your business receives all the support it needs and that you are comfortable with the people handling your accounts. Remember that your CPA’s role does not stop at tax planning and preparation — they are your trusted business advisors. They can be your source of light when your business is facing uncertainties and they can help you make the right financial decisions when you need some guidance. Look for an accountant who would treat your business affairs as they would treat their own.

Services

As a business owner, time is money, and choosing the right CPA can buy you more time, allowing you to focus on achieving your goals. Some accountants are willing to do bookkeeping and payroll for example, on top of the usual services they provide.  Other accountants stick to the core stuff only, like financial statements and tax filings. You’ll need to evaluate where your strengths and weaknesses are and what your pain points are — so that you can free up your time to run and grow your business.

Security

Although the digital age has opened the gates to faster and more convenient methods of handling information, it also brought along new risks and threats. Find someone who is proactive in taking regular security methods to keep their clients’ sensitive information safe. Do they use encryption software to handle your private information? What are their practices for data integrity and security? It is crucial that your CPA guarantees security that is “airtight” and has a very low risk of facing a security breach.


How to Hire Bookkeeping Help

Is it time to hire a bookkeeping service for your small business? Perhaps your business is growing, or you don’t have time to do it all on your own anymore. Whatever the reason, there are plenty of bookkeepers out there ready to help you keep your books in order.

Why Hire a Bookkeeper?

According to research by Clutch, almost half of small businesses (45%) don’t employ a bookkeeper, and a quarter of small businesses still record their finances on paper instead of a computer. Doing your bookkeeping by yourself isn’t easy. It can be easy to make errors or miss something important. Manual bookkeeping can also put your data at risk from damage or theft.

Hiring a Freelance Bookkeeper

Freelance bookkeepers can benefit your business in many ways. Because they typically work from home, their overheads are low and their fees competitive. Rates can range from $15-$50 per hour depending on the nature and range of work you want them to do—and you only pay for the hours you use. Freelancers are also business owners and stake their reputation on meeting deadlines and taking their work seriously.

Working With a Bookkeeping Firm

Bookkeeping firms may cost more than a freelance bookkeeper but for good reason. They bring a range of experience to the table, access to a larger team of experts, and guaranteed coverage. Unlike a freelance bookkeeper, if your dedicated bookkeeper takes a vacation or is otherwise unavailable, someone else can seamlessly step in

Understand the Difference Between a Bookkeeper and an Accountant

In your search for bookkeeping help, don’t confuse bookkeepers with accountants or CPAs. Many accountants provide bookkeeping services, but they can also prepare detailed financial statements (profit and loss statements, balance sheets, etc.).


What is the best way to find companies needing bookkeeping and accounting services?

To find companies who are need of bookkeeping and accounting services we need to market our company and reach through different mediums of marketing. Those companies who really need bookkeeping and accounting services can contact outsourcing companies, they can search from the internet and other mediums. If you have marketed your company good then there are more possibilities of getting selected. The other fact is that the outsourcing company should be genuine and provide professional services at competitive rates.

It is not an easy decision to take when looking for an accounting or bookkeeping service. You could be facing a dilemma of choosing an offline service over an online one. However, with the shortage of availability of good accounting services offline, it is recommended that you choose online accounting services

Industry Experience and Certified Staff – Make sure you are hiring an accounting and payroll agency with expertise and specialized knowledge of your industry

Cloud or Web-Based Service Architecture – Find an accounting agency that can provide you with immediate access to your own financial data anytime, anywhere using any devices

Metrics for Quality Assurance – The main reason you are hiring a third party accounting outsourcing agency is that they offer core functions that you lack

Pest Control Wasps Or Bee

Getting rid of wasps the right way

The best way to remove a wasp nest is contacting a pest control professional. It may seem like an easy job, but a pest control expert is professionally trained to handle and remove wasp nests in a safe and efficient manner, and here’s why:

  • Safety equipment: An exterminator has access to personal protective equipment (PPE) and respiratory protective equipment (RPE). This fully protects them from wasp stings, ensuring their safety when removing a wasp nest
  • Working in small spaces: Pest specialists are trained and qualified to work in small spaces such as your attic. This allows them to successfully remove a wasp nest safely from a property.
  • Expert knowledge: A pest control professional has expert knowledge on wasps; they know all about their behavior and instincts as well as how to identify the signs of an allergic reaction to wasp stings.
  • Professional products: Wasp exterminators have access to, and are professionally trained to use a variety of pest control products not available to the public. These products are more powerful than any DIY products on the market and have a proven track record of successfully removing wasp nests.


How To Keep Wasps From Building Nests Around Or In Your Home

Like we mentioned above, food is a key motivator for wasps when it comes to choosing where they might build their nest. To ensure they don’t do so, it’s imperative to remove any unwanted food or drink around your property and to keep your trash cans and trash areas covered and tightly sealed. More specifically, though, since wasps are drawn to sweeter foods, you may want to consider removing nectar and bird food that you may have intended for other animals if your priority is keeping wasps away.

If you are on a wasp control mission, another consideration is your home’s structure. As we mentioned above, queens find cracks and holes in your home during the colder months to ensure a secure and a warm place to hibernate. To avoid attracting additional queen wasps, be sure to repair any broken panels or siding, patch cracks in walls and repair any additional crevices you find on both the interior and exterior of your home. In your lawn, consider filling in any holes—occupied or vacant—with dirt or debris. Doing so will keep a wasp colony from making and building their home in a burrow.


Wasps: How to get rid of a wasp nest in your home according to pest control expert

WASPS are a dangerous pest to have in your home, bringing the risk of painful stings. An expert reveals how to get rid of a wasp nest from your home. Wasps in the home can cause misery and fear for property owners. If you experience a huge influx of wasps, it is likely you have a wasp nest and will be keen to learn how to get rid of it.

This could be in a often uninhabited part of your house, for instance in your loft. Alternatively, it might be on the side of your roof. A scratching or crackling noise could be a sign wasps are making a nest in your home. Wasp nests cause damage to your property, because they are produced by wasps chewing wood materials in your home into pulp.


Why Wasps Go Dormant

Although they are a fearful flyer for those who don’t enjoy the stinging insects, wasps will leave once they know their stay is no longer tolerated. This takes some work on your part to give them their walking papers without causing serious injury to you or them. Wasps will go dormant once the nest is no longer viable. There are many ways to adios unwanted wasps near the spaces where you, children or friends and family gather. If you spray the nest with soapy water at a safe distance wearing protective clothing at night, you can render the nest useless. Once a nest is useless, the wasps will go dormant, and it is safer to remove the entire nest so that the wasps know not to return to your wasp-intolerant abode.


How to Get Rid of Wasps in Roof Vents

Wasps cause problems when they build nests in or around your home. They will defend their territory and get aggressive if you get too close to a nest or try to disturb them. Roof vents are attractive to wasps because the vents are covered and therefore offer protection. If wasps aren’t dealt with as soon as they start nesting, an infestation becomes a greater risk. Getting rid of wasps in roof vents requires diligence to make sure they don’t return.

Step 1

Spray an insecticide into the vent to kill any wasps that are currently in the vent. Wear a breathing mask and follow all instructions on the package to prevent inhalation. Spray at dusk when the wasps are more likely to be dormant inside the nest.

Step 2

Cover the vents with plastic bags for several days to prevent more wasps from going into the system.

Step 3

Check your attic for openings that the wasps could be using to get into the vents. Breaks in the insulation or small holes in the wood are common sources for wasp entry. Any breaches require sealing to prevent more wasps from entering. Wear long-sleeved shirts and long pants to help protect against stings.

Step 4

Call a professional if the wasp problems continue because stings could be dangerous, especially if you’re allergic to them.